I cant tell you how many times I have heard the words " You are such a Martha Stewart" (haha) I just love crafting, diy, painting, sewing, and home decorating. It gives me great satisfaction to look around my house and say " I MADE THAT!"

Monday, March 19, 2012

Prep School Puppy Gift Set

  A few weeks ago I created a another newborn gift set for my friends Bethany and Solomon Yang! They are so excited about having their very first baby, and it is going to be a little BOY! Well I just had to make baby Judah a unique homemade gift! Here is what I came up with....

I am just IN LOVE with newborn knit and crocheted hats, but sadly I don't know how to do either!!! Thankfully I found out the Hobby Lobby sell them already made for $3.99 (using a 40% coupon they would be even less! SCORE) Well that solved my problem. I sewed on a little felt, fabric, a few buttons, and turned a plain white hat into THIS!


       I also made him a set of personalized Burp Cloths :)


      Of course I needed to make some adorable tie onesies! They are just too cute, and sooooo EASY!


      And here it is all together! I love the way the aqua and the green pop each other against the slate gray background! :D


   Oh I made a Passy Clip too. She was so excited to see everything I came up with! Little did she know that it cost under $10 and was all put together in a few hours!!! Did I mention how much I LOVE fusible web! Without it, these projects would take 3x as long, and not come out as crisp! Well hope you guys have a great week! I know I will!!!

  Greg is coming HOME for his week R&R Thursday, before being shipped overseas! I can't wait to just see his face. It has only been two months, and I have missed him like crazy already! How I am going to make it through the whole year?!?! With faith and trust in my Lord! Love and SUPPORT from my family, friend, and awesome followers. You guys don't know how much it means to me to get so many sweet comments each week! I know my posting has been soooo sssslloowww, but i am going to try to knock out a few posts tonight and share them through the next two weeks!


Love you ALL,

Jeni

Friday, February 24, 2012

Modern Vintage Art Redo

  I just finished this project yesterday, and I was too excited about it to wait until next week to post it! I loved Abby's Modern Vintage Art , but I wanted to add some of the teal color into it. At first I was just going to change the bow in the little girls hair to a teal one, but slowly I ended up change everything. (Isn't that how most projects turn out). Well you know me, enough chit chat and on to the pictures ;)


  I LOVE the soft airy feel going on in her room now!


Here are some closeups of each piece!!!
   I added the same trim I used on the Ric Rac Cuff Sheets over the black velvet. I think it looks like a completely different frame with the teal finish on it!


  For the Little Girl, I changed out the background to one that matches her Photo Art Blocks. The color is a little darker in this picture than in real life.


  For the Little Boy's picture I changed out paper to again match the Photo Art Blocks. Then added a pink bow tie!


   I LOVE the way these turned out!!! From the teal distressed frame to the real metal keys and locks ! Much better than the before paper version!


  This cute hair bow holder I made yesterday to go in the middle, it fills the space so much better than the smaller frame. I hot glued the ric rac on the inner grove of the frame, then added the lace across the back.

  Here is a close up of the fabric flowers I added to the bottom corner! :) They make me happy, and Abby too. She keeping going in her room and saying ooooh pretty flowers. :D


    One last picture of that side of the room! It is finally coming together.

  Oh I forgot I haven't done a post about her closet makeover ;) Well that is coming soon my friend.
I have a few more projects I want to tackle still.
- new curtains
- old mantle shelf with knobs
- lace bunting

  I am so excited to see how it all comes together! :) Tell me what do you think? Do you LOVE the pink and teal together as much as I do?


Thanks for stopping by,

Jeni

Tuesday, February 21, 2012

Ric Rac Bed Sheets

   The last two weeks I have had so much fun decorating Abby's big girl room!!! :) I wanted to share one of the easy projects I did to add a pop of color to her bed. I was inspired by these adorable Ric Rac Cuff Sheets by Pottery Barn Kids.


    I just loved the look but the PRICE and the colors were not going to work for me! So I went to Hancock Fabrics and bought 2 packages of medium size Ric Rac and 3 yards of teal blue trim. First I sewed the ric rac on right over the cuff line on the pillow case and the top sheet. Next I sewed the teal trim over the ric rac letting it peak out just a little bit!


  Here is the pillow case all done! Now I just need to get Abby's name added to the cuff!


I LOVE the Teal and Pink together!!!!


   She LOVES her big girl bedding!!!


   I am so excited to get the rest of her pillows done and her upholstered headboard!!! :) So what do you think?

Cost

2 Packs of Pink Ric Rac- $3
3 Yards of Teal Trim- $3
Total= $6

Pottery Barn Kids Price
sheet set and pillow case= $101.50

That's a huge savings!!!

  What projects are you working on? Do you LOVE ric rac as much as I do?!?! :D


Thanks for stopping by,


Jeni

Exciting Things Happening Here

  Hey guys, it has been a crazy month around my house, with Greg gone for his predeployment training, and with adjusting to single parent status. Greg has a week off in March before shipping out!!! I am excited and so sad at the same time. I will get to see my husband, but this will be the last time. :(

 But thankfully God is always there sending little blessing our way to make our struggles bearable. I have had quite a few of these! Like Becoming Martha hitting 200,000 page views last month. Thank you so much for all your sweet comments, and encouraging words! I would of stopped blogging months ago with out YOU!

  If that wasn't great enough news I was emailed that Abby's nursery took 3rd place out of 100's in a Unique Baby Gear Ideas Nursery Contest! Not only could I NOT believe we even place against the amazing competition, but also we won a $100 gift card to Amazon.com!!! SWEET!!!! I already bought Abby's twin bedding and will have a post on that as I finish her bed! The contest starts every Jan. and goes until the end of Dec. I entered in July, so it is never too late to enter. Also there are so many wonderful ideas on this PAGE! 1st place is $500 Amazon gift card! It is worth the few minutes it takes to enter, believe me I didn't think I had a shot in the dark!


  Last but not least I was nominated by my sweet friend Amy on her Blog Full Circle Homeschooling for a Versatile Blogger Award! I was so honoured and touched that she choose me! I want to do the same thing for one of you! Please leave a comment on this post with a link to your blog, I would LOVE to come visit each one of you! Then I will chose one of you to pass this award onto! What a great way to encourage one another! :D


Sunday, January 15, 2012

Paisley and Pokadots

  This week I have been working on my boot pattern and it was a big FLOP! :( Hopefully I will come back to it soon and try to tweak the pattern! Then I got the exciting news that my best friend Lauren had her sweet little girl! :D This brought me out of my sewing funk! Here is the gift set I make for sweet little Ms. Alana Kaylynn Smith. Did I mention how much I LOVE sewing baby things!?!


    I always start with the burp cloths. Designing them gives me a direction to go with the rest of the set. I even added two more new ideas, the newborn charm bracelet, and the CUTE sun bonnet!


  For this onesie I added ruffles to the bottom. I have always wanted to do that! I think they are just precious!


  Here is a close up of the burp cloths. I love how the lace really brings out the femaine qaulity of them! They look like they are were make for a princess (which they were ;) haha!).


Baby tutu's are so easy to make and I think they look so cute in pictures!!!


Here is a close up of the frayed rose hair pretty or tutu clip I made!


I like to cover the clip with ribbon, so that it has no hard edges on the baby.


My ruffled bottom onesie!!! I love it!


Did I tell you much I LOVE this bonnet!?! The pattern was so EASY!


Little baby ballet flats trimed in the same lace!


   I started beading too! It is so fun and it takes no time at all!


So what do you think, are you going to try to make a cute gift set for a little one in your life?


  Thanks for stopping by!


Jeni

Friday, January 6, 2012

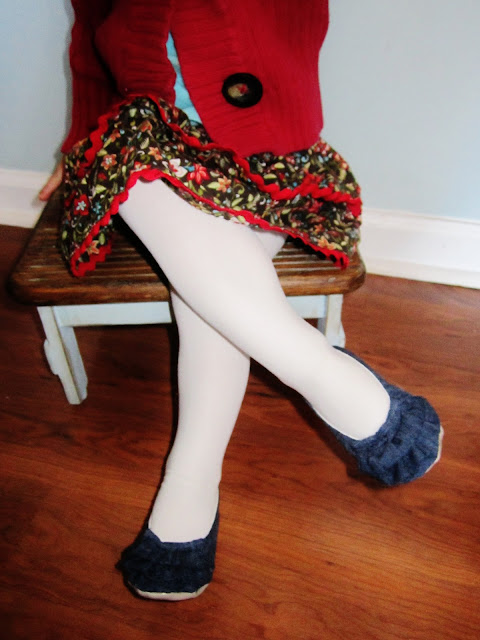
DIY Ruffled Denim Ballet Flats

   This week I sized up my pattern for Abigail's ballet flats, and figured out how to make a sole!!! I found thick shelf lining at Walmart, it sews wonderfully and adds a lot more sturdiness to the soles of her shoes. Here is a link to my pattern that I made for her shoes and the step by step instructions :) Ballet Flats Tutorial.  I also came up with a boot pattern that I will share soon!


  Abby was all about the sass today! haha I just have to laugh at these next few, two year olds...


 She is actually watching TV in this one haha.


  Not sure WHAT is going on here! LOL


Don't you want to smile pretty for Momma?


  I finally got a smile out of her when, Cole was being silly to make her laugh!


  Here are a few close-ups of these shoe, p.s. Did I tell you that I am just in LOVE with them. They seriously make me want to make a pair for myself! haha Her shoe collection is bigger than mine!


  This pattern is super easy and I can whip out a pair in about an hour! Not to shabby if I do say so myself. I went to Hancock Fabric's today and picked up so cute material to play with over the weekend! Hopefully I will have some cute BOOTS to show off next week!!! Wish me luck.


Thanks for stopping by,

Jeni


Tuesday, December 27, 2011

Photo Art Blocks

  Hello everyone! I hope you all had a wonderful Christmas. I am so excited to show you the AMAZING Project I have been working on!!! It turned out just as I pictured it in my head, which makes me even happier! Ok, enough chit chat. On to the project...

  I started with the same steps as the Easy Art Blocks. I went to Lowes and had them cut down a
12 in x 4ft board down to (4) 12in x12in boards ( I needed 5, but already had an extra one at home ) total cost $3.  Next I set all 5 on top of cups ( I know it looks kind of Ghetto, but it worked) haha ;) This made it easier to paint all 4 sides.


  While sides are drying, lay out your paper and photo combations to find which pattern is going to work the best.


  After all the sides are painted and dry you can mix your watered down glue to make a thin paste like this...


  Paint it on and let dry for a minute, until it is tacky. Once tacky add 12x12 scrapbook paper (trimmed to fit each block) I like to use my Pampered Chef Scraper to get any air bubbles out.


  Then I added the distressing to the sides. I couldn't find my beloved Distessed Ink pad so I just used some of the espresso paint mixed with glaze.


  Add photo corners and 8x 10 print and you are good to go!!!


  The BEST thing about this project is not only is it easy but CHEAP! You can always change out the 8x10 to get a whole new look, that is the GREAT thing about using the photo corners!

   Wood $3 (Lowes)

   5 8x10 pictures $9 (Snapfish using 50% code)
  
   5 scrapbook pages $2 (hobby lobby)

   Photo corners $0 (had from scrapbooking)

   Paint and glue $0 (had from old projects)

       TOTAL= $14


  I can't wait to see what it will look like when I add her DIY fabic headboard twin bed and cute bedding!!! What have you been working on this week? I would LOVE to know, and stop by and check it out, leave me a comment!


Thanks for stopping by,

Jeni