I cant tell you how many times I have heard the words " You are such a Martha Stewart" (haha) I just love crafting, diy, painting, sewing, and home decorating. It gives me great satisfaction to look around my house and say " I MADE THAT!"

Tuesday, August 30, 2011

Transportation Art Knock Off

   That's right I did it... I made my very first knock off!!! My inspiration was the Pottery Barn Kids Transportation Art.

From August 30, 2011

  I first went to Lowe's and bought my old faithful (plywood shelving board at $2. 92) I also had them cut it down for me to 12in. x 12in. squares. I only need 3, so I had one more for a later project. :)

From art


From art

I got them home and painted the edges white.

From August 30, 2011

  Then I added a thin layer of watered down Elmer's glue, let it tack up, and then added the white scrapbook paper. I distressed the edges using my favorite crafting tool ( I <3 My Distress Ink Pad )

From art

  Here is the hard part... I had to free hand the actually boat, truck, and plane. I wish I would of made the truck a bit longer and not so wide, but over all pretty happy with it! I really wanted my pictures to have the same hand painted feel as the Pottery Barn set, so I got out my little paint brushes and copied each one exactly. 

From art

From art
With my center pictures done all I needed to do now was add the lettering with was EASY with my Circut! ( I cut the letters out using the Plantin Schoolbook font cartridge) I used the same watered down glue technique to add all the elements together on the plaques! Add picture hangers to the back and my knock off is complete! Here are both together. What do you think?

From August 30, 2011

From August 30, 2011

From August 30, 2011

From August 30, 2011

Here is the run down...

Pottery Barn Kids Set = $69 each or $207 for the set

My set= $6 that's right over $200 savings

boards- $3
white paint- already had
distress ink pad- already had
7 pages of scrapebook paper- $3


Thanks for stopping by,

 Jeni

Tuesday, August 23, 2011

Board and Batten

  I am FINISHED!!! It was like the heavens opened up and I was hearing the angels sing! I LOVE how it turned out! Cole's big boy room is so much cuter than I even thought it would be. Ok here are the pictures of the finished walls. I will show you my process first! ;)

  I bought 4ft strips from Lowes for $1.98 each

From August 23, 2011

 Space them 14 inches apart and level and nail them in place.

From August 23, 2011

  I painted 3 coats of white on the wall before I added the strips to save time.


From August 23, 2011

  I added a 3inch x 8 white boards across the top.


From August 23, 2011

From August 23, 2011

I just LOVE the clean look of it!!!

From August 23, 2011

 I have so many more ideas for this room!!!

From August 23, 2011


Thanks for stopping by,

Jeni

New Tables and DEAL ALERT

   Ok so here is the deal, when we bought our house we took measurement of our bedroom to make sure our new furniture would fit. Well it did, but we had to put it on the window wall. After living with it this way for 18 months we learned a few things. Not only was it hard to open the drawers to the dresser because the bed was too close, but one of the night stands was over the vent.

 Hot summer + vent covered= one HOT Momma!

   Well 2 weeks ago I had ENOUGH, and I moved my bed on the "bed wall" The one without a door or window on it. We LOVED it, the room opened up so much! The dresser has lots of space, but ( I know there is always a BUT) something was off. Only one night stand would fit and our closet doors open. :( I was really bummed for a day or two, but then Greg said lets just get new tables. I LOVE this man! After searching the web, and craigslist for days I found these babies at Target for $27.99. ( I was going to add a link to target, but they repriced them to $70.00 again) We looked at them last year when they were $75 and loved them, so to find them on clearance and still in stock was a huge surprise! ( and major blessing) Here they are in the room!

P.S. They came already put together :) SCORE!!!

From August 23, 2011

Here they are in the room!

From August 23, 2011

I cant wait to get all the art done for over the tables and bed. I might even get new lamps :) I will be back soon to share with you the art project I am doing. Taking old Safari pictures and making them Cottage Chic!

here is a peek of just the frames ;)

From August 23, 2011

Thanks for stopping by,

Jeni

Just Loaf'n Around

    I am back with my latest baby gift! It has been a crazy two weeks! I finished Cole's board and batten, moved around my room, and finished up a few projects I have been working on. I was able to size down Abby's ballet flat pattern and alter it to make a pair of newborn loafers :) Along with some other cute goodies for Mr. Ethan Zachariah Blanton! His mommy just loved everything I made him :) Here it is...

Little Loafers with Velcro closures on the sides

From August 23, 2011

2 Tie Onesies

From August 23, 2011

From August 23, 2011
3 Burp Clothes

From August 23, 2011
and a pair of Shorts

From August 23, 2011

Here it is all packaged together.

From August 23, 2011

I am working on a Pottery Barn Knock for her nursery also ;) I will share that tutorial with you next week.

Thanks for stopping by,

Jeni

Friday, August 5, 2011

Lil Posh Bebe

  Last night we had a surprise shower for one of my best friends! We totally surprised her, it was great! Well I wanted to get all of her stuff done for the shower, but sadly I didn't. I am sure she wont mind getting more gifts through the month ;) Well here is what I got done for her! :D

 Alyssa's middle name is Rose so you will see a theme in my gift.

From August 5, 2011
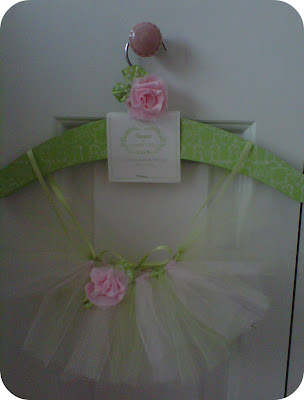
  This is my favorite tutu so far! It cost $1.50 to make!!! You can find my Tutu Tutorial HERE
I just LOVE how the frayed roses turned out! The one on the top of the hanger is actually a hair clip! The cute hanger was on sale at Michael's for $1.20 (Score)

From August 5, 2011

I will have to do a tutorial on how to make these beautiful frayed flowers, I just LOVE them. I layered these two with tulle in the center.

From August 5, 2011

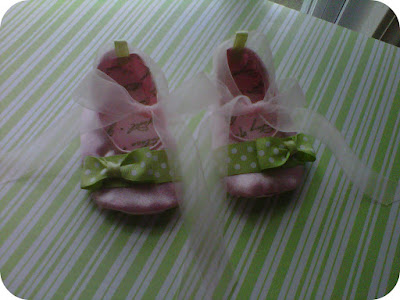
  I FINALLY was able to size down Abby's ballet flat pattern to a newborn size! Here it is next to a store bought set. The writing on the inside of the shoes are names of different flowers, including roses ;)


   I loved the way these turned out, but I still wanted to add ribbon to help keep them on those sweet little baby feet!


    I think the pink sheer ribbon adds another touch of class :)


  I only got one burp cloth done :(  ( I still need to finish the other two and a cute outfit! )
This was my first time doing layered embroidery! I really like the way it turned out, with my normal sewing machine.

  I didn't get a picture of the hair bow holder under the shoes. I just used a wooden plaque I had and painted the edges. Next I added scrapbook paper to the top of it, and add two ribbons hanging down to clip her hair bows on! Easy Peasy!!!
  And... Here it is in the striped green box, all ready to be closed up and wrapped with thick pink satin ribbon and a huge bow! Did I tell you how much I LOVE making little girl stuff!!!


I spent about $10 all together on this gift, but I put a lot of LOVE and work into it!


Thanks for stopping by,

Jeni