I figured I would do this tutorial as well since it is so similar to the Art Blocks!
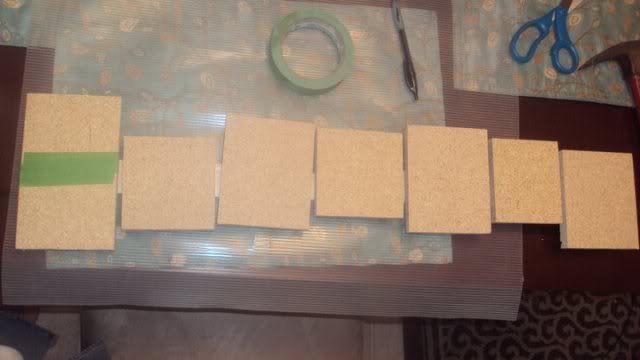
1. I went to Lowe's and bought a 4 foot particle board for shelving. I had them cut the length of the board to 4 inch strip that was 4ft long. then I had them cut (3) 4inx4in squares (3) 6inx4in rectangles (1) 7 1/2 in x 4in rectangle I used a cheap pine 1x2 and had them cut it to 36 inches. The hard part is done for you! :D

2. Next you can pick out 7 pieces of scrapbook paper (2 solid color papers for letters) in the colors you want to decorate your Laundry room in and a small bottle of craft paint ( i used espresso brown)
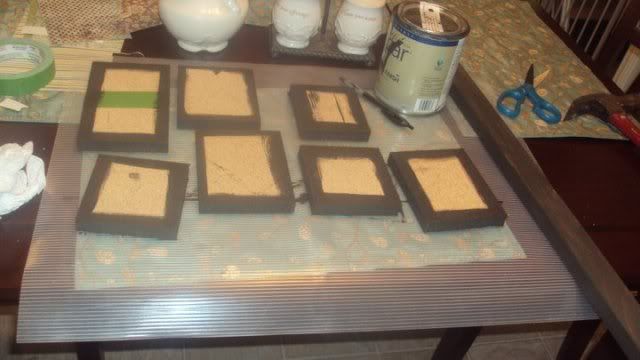
3. Paint edges of all squares and front and sides of 1x2.

4. Next nail the squares into place on 1x2. * make sure nail head is level with surface of square, so it wont show under paper.
the spacing is 7.5inch- 4inch -6inch- 4inch-6in-4inch-6inch *stagger them up and down also ( DON"T just nail them down centered)
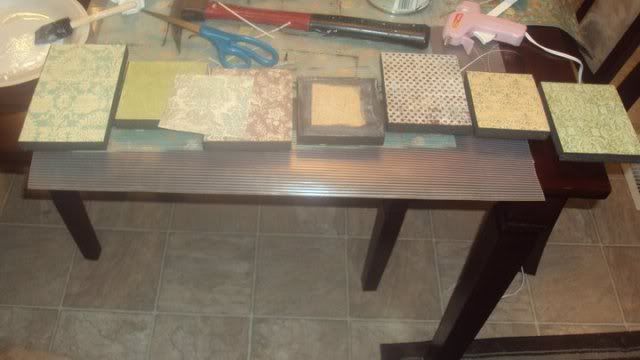
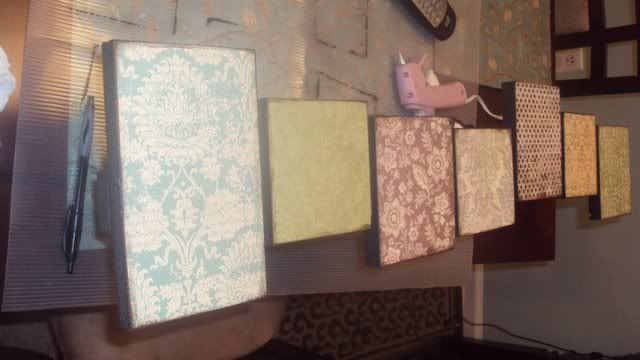
5. Use craft glue watered down to a thin paste to and paint on fronts of squares and let sit and tack up before putting your paper on. Smooth paper on squares and make sure there are not bubbles. * I used a cricut to cut out the letters Laundry, but if you don't have one you could print out the letters on your printer and cut them out. then trace them and cut out on scrapbook paper.


6. Use the same watered down glue on the back of letters. you could use a glue stick too.
7. Add picture hanging kit to the back, and you are all done!
 |
| From Becoming martha pictures |
Good Luck! Let me know if you need more help!
Thanks for stopping by
Jeni

you need to do my house..
ReplyDeleteI love this! great tutorial
ReplyDeleteAmazing! I'm going to use this for something....
ReplyDeleteYou need to do this for my rustic laundry room! :) I am sure you could think of something amazing!!
ReplyDeleteLove this idea! Absolutely darling!!!
ReplyDeleteLove your blog and can't wait to read more, I am your newest follower.
-emily
nestnestingnested.blogspot.com
I seem to keep clicking on your posts through all of the link parties i am participating in!! you are so talented, and i love your crafts!!
ReplyDelete-i am now your newest follower!! :)
I've been browsing all your projects and think you might be a fit for a guest blogging series I'm working on! Please email or comment me through my blog at http://theoldsimplelife.blogspot.com
ReplyDeleteYeah! :) I got your comment about guest blogging, but I can't find an email for you. Could you please get me one? Or email me at drewnchels at hotmail dot com. Thanks!
ReplyDeleteSo beautiful!Love your blog! I am your newest follower
ReplyDeletei like this
ReplyDeleteThis is awesome! Just discovered your blog today :)
ReplyDeleteLove this!! I will have to do this for my new laundry room
ReplyDeleteTotally doing this!! Saw ya on Tip Junkie! Thanks!
ReplyDeleteHi I have a question. How did you get the edges of the paper uneven? Is it paint? What was your technique?
ReplyDeleteWhat size letters did you use?
ReplyDeleteI rubbed a distress ink pad along the edges to give it that worn look and I cut the letters using my cricut set at 3 1/2 inch letter for the L and 3 inch letters for the lowercase. Hope this helps!
ReplyDeleteJeni@ Becoming Martha
Love your ideas, and so excited to try them! Can you tell me what font you used for this laundry sign? Thanks!! :)
ReplyDeleteLove this! New fan and fellow Army Wife Hooah!
ReplyDeletewhat kind of distress ink do you use??
ReplyDeleteIs there a way to put like a shellac or glaze over it to cure it?
ReplyDeleteHow much would you say this project costed you? I love the idea but I'm afraid I'll start it and find myself in over my head.
ReplyDeletearound $6. I bought one $3 4ft shelving board had them cut it down. Then I bought a book of scrapbook paper for $3 I used glue and paint I already had :)
ReplyDeletewhat kind of glue did you use? Would Modge Podge work? thanks
ReplyDeleteDifferent ?... Do you happen to know the paint color of your laundry room? It looks close to what I am looking for as I redo my laundry room... but I get overwhelmed when I go pick out samples!
ReplyDeleteThis is so cute! We are doing this project for a Pinterest Party I am having this Tuesday. Thanks for the idea! I see someone asked if Mod Podge would work. Will it? And why does it need to be watered down? I am so new at trying to be crafty. :-) Thanks so much!
ReplyDeleteChrissy
Thank you very much for this Tutorial, will get down to is shortl. xxx
ReplyDeleteHi I made one of these and when I went to hang it on the wall it hangs down for some reason instead of the board hanging flat. I tried to put hangers where I could hit a stud when I hung it, do you think that is the problem? it is a 48 in board and I have the hangers at like 8 inches in from each end. Im wondering if I need to place them at the ends of the board . thanks for any help
ReplyDeleteankara
ReplyDeletesakarya
tekirdağ
kastamonu
amasya
3FK
https://titandijital.com.tr/
ReplyDeletemalatya parça eşya taşıma
bilecik parça eşya taşıma
antalya parça eşya taşıma
hakkari parça eşya taşıma
5ESG3
malatya evden eve nakliyat
ReplyDeleteartvin evden eve nakliyat
kocaeli evden eve nakliyat
ankara evden eve nakliyat
düzce evden eve nakliyat
D3HE
istanbul evden eve nakliyat
ReplyDeletebalıkesir evden eve nakliyat
şırnak evden eve nakliyat
kocaeli evden eve nakliyat
bayburt evden eve nakliyat
0EB2F1
denizli evden eve nakliyat
ReplyDeletekars evden eve nakliyat
çorum evden eve nakliyat
kars evden eve nakliyat
malatya evden eve nakliyat
U7DK
AB883
ReplyDeleteLbank Güvenilir mi
Kayseri Parça Eşya Taşıma
Diyarbakır Parça Eşya Taşıma
Aydın Evden Eve Nakliyat
Kırıkkale Şehirler Arası Nakliyat
Amasya Şehir İçi Nakliyat
Artvin Parça Eşya Taşıma
Karapürçek Fayans Ustası
Kars Parça Eşya Taşıma
44351
ReplyDeleteHotbit Güvenilir mi
Antep Şehir İçi Nakliyat
Malatya Lojistik
Ünye Oto Elektrik
Ardahan Evden Eve Nakliyat
Hatay Lojistik
Gümüşhane Şehir İçi Nakliyat
Iğdır Lojistik
İzmir Evden Eve Nakliyat
1B851
ReplyDeleteVan Şehirler Arası Nakliyat
Antalya Evden Eve Nakliyat
Rize Lojistik
Tekirdağ Boya Ustası
Yozgat Parça Eşya Taşıma
Batman Şehir İçi Nakliyat
Düzce Şehir İçi Nakliyat
Tunceli Lojistik
Hatay Lojistik
8D32C
ReplyDeleteAntalya Şehir İçi Nakliyat
Karabük Şehirler Arası Nakliyat
Muş Şehir İçi Nakliyat
Rize Şehir İçi Nakliyat
Ordu Şehirler Arası Nakliyat
Adana Parça Eşya Taşıma
Mamak Parke Ustası
Sivas Lojistik
Manisa Lojistik
26B8C
ReplyDeletebinance indirim kodu
A9D9D
ReplyDeletebinance %20 indirim
8DFFB
ReplyDeletesinop sesli sohbet sesli chat
rize bedava sohbet siteleri
bilecik kızlarla canlı sohbet
adana chat sohbet
hatay sohbet chat
muğla sesli sohbet
en iyi sesli sohbet uygulamaları
niğde telefonda rastgele sohbet
balıkesir en iyi görüntülü sohbet uygulamaları
917E3
ReplyDeletesinop canlı görüntülü sohbet
Balıkesir Görüntülü Sohbet Kadınlarla
Edirne Telefonda Canlı Sohbet
Aksaray Görüntülü Sohbet Uygulama
kadınlarla görüntülü sohbet
Hatay Rastgele Sohbet
adıyaman kadınlarla rastgele sohbet
tokat canlı sohbet sitesi
en iyi görüntülü sohbet uygulamaları
AE344
ReplyDeleteKripto Para Nasıl Kazılır
Youtube Abone Hilesi
Kwai Takipçi Hilesi
Bitcoin Nasıl Çıkarılır
Shinja Coin Hangi Borsada
Bee Coin Hangi Borsada
Bitcoin Kazanma
Tiktok Takipçi Hilesi
Onlyfans Takipçi Satın Al
C6848F0518
ReplyDeletetiktok düşmeyen takipçi
633D07173A
ReplyDeleteınstagram takipçi
AB2FB36725
ReplyDeleteinstagram turk takipci satin al
693E4966E4
ReplyDeletegörev yap coin kazan
telegram coin kasma nedir
oyun oyna coin kazan
coin kazan
telegram coin kazma
943F135A98
ReplyDeletemmorpg oyunlar
sms onay servisi
mobil ödeme bozdurma
instagram takipci satın alma
-